Working With Multiple Files
Creating Projects (With Tabs)
In the current version of TextMate (1.5) file tabs are only supported when a project is created. Fortunately it is easy to create a project, namely by selecting File → New Project (⌃⌘N).
This opens a window which looks like the one below.
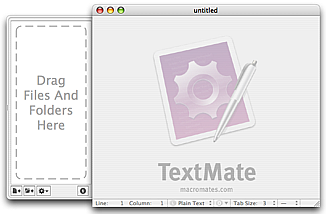
It is possible to add files either by dragging them to the (project) drawer, or use the “Add Existing Files…” action in the project drawers action menu (the one with the gear icon).
Another way to create a project is by dragging files directly onto the TextMate application icon (shown e.g. in the dock). This is a shortcut for creating a new project consisting of these files.
One minor detail is that when creating a project this way, you will not be asked if you want to save the project, when it is closed.
The advantage of saving a project is to maintain state (e.g. which files were open) and to be able to quickly re-open a particular set of files. If you leave a (saved) project open when you quit TextMate, it will automatically re-open that project the next time you launch TextMate.
It is also possible to create projects from the terminal e.g. using the mate shell command.
Auto-Updating Projects
When you want to have your project mimic the files and folders on disk, you can drag a folder either onto the TextMate application icon, or into the project drawer.
TextMate will then create a folder reference where it automatically updates the contents of the folder when it changes on disk.
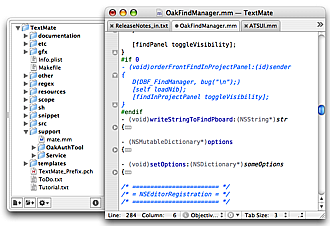
Currently updating is done when TextMate regains focus and can be slow for some network mounted disks, in which case you may want to settle for only adding individual files to the project (which can be grouped and re-ordered manually to mimic the structure on disk).
The refresh delay for network mounted disks will be addressed in a future release.
Filtering Unwanted Files
When using folder references, you may want to have certain files or folders excluded from the project. This can be done by changing the file and folder patterns found in Preferences → Advanced → Folder References.
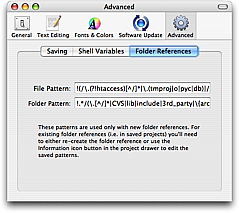
These are regular expressions which are matched against the full path of each file and folder. If the pattern does match the item, it is included, otherwise it is excluded. To reverse that, so that items which match are excluded from the project, prefix the pattern with an exclamation point (!).
The patterns are only used when creating new folder references. For existing folder references one can select the folder reference in the project drawer and use the info button (a circled letter I) in the project drawer to edit the patterns.
The complexity of this system will be addressed in a future release.
Text and Binary Files
You can either single or double click files in the project drawer. If you single click them and the file type is text, they open as a file tab in the main window.
![]()
If you double click a file, it will open using the default application. Note that folders can also be double clicked e.g. Interface Builder’s nib files will appear as folders, but can still be double clicked (and will then open in Interface Builder).
As mentioned, only text files will open in the main window when single clicked. The way TextMate determines if a file is text is by its extension - if the extension is unknown it scans the first 8 KB of the file to see if it is valid UTF-8 (which is a superset of ASCII).
If TextMate does not open your file and it does have an extension you can bring up the action menu for that file and pick the last item, which should read: Treat Files With “.«ext»” Extension as Text.
Positioning the Project Drawer
The project drawer will by default open on the left side of the project window. If there is no room for it to open there, it will use the right side instead. This setting is sticky so will remember which side the project drawer was last opened on.

To move it back to the left side you need to close the drawer (View → Hide Project Drawer) and then move the project window so that there is no longer room for the drawer on its right. When you then re-open the drawer, it will again appear on the left side and use that as the new default.
The opposite can be done to force it to open on the right side.
Find and Replace in Projects
Using Edit → Find → Find in Project… (⇧⌘F) will bring up the window shown below.
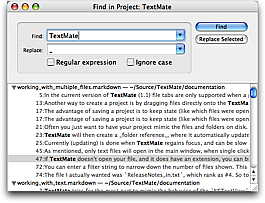
From here it is possible to search all (text) files in the current project and do replacements. After pressing Find it is possible to either press Replace All, or select which matches should be replaced, in which case the Replace All button will change to Replace Selected.
Currently it is not possible to limit the scope of the search to anything other than all text files in the full project. As a workaround, when you want to search only a subset of your project, you can select the files you want to search in the project drawer and drag the selection to the TextMate application icon to create a new scratch project. A find/replace can then be performed on that project, which can then be closed.
Moving Between Files (With Grace)
When working with projects there are a few ways to move between the open files.
The most straightforward way is by clicking on the file tab you need. This can also be done from the keyboard by pressing ⌘1-9, which will switch to file tab 1-9.
You can also use ⌥⌘← and ⌥⌘→ to select the file tab to the left or right of the current one.
It is possible to re-arrange the file tabs by using the mouse to drag-sort them (click and hold the mouse button on a tab and then drag it to the new location). This should make it possible to arrange them so that keyboard switching is more natural.
One more key is ⌥⌘↑ which cycles through text files with the same base name as the current file. This is mainly useful when working with languages which have an interface file (header) and implementation file (source).
When you want to move to a file which is not open you can use the Go to File… action in the Navigation menu (bound to ⌘T). This opens a window like the one shown below.
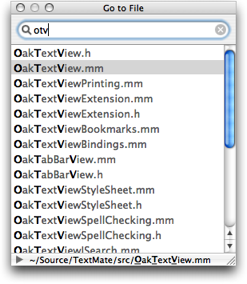
This window lists all text files in the project sorted by last use, which means pressing return will open (or go to) the last file you worked on. So using it this way makes for easy switching to the most recently used file.
You can enter a filter string to narrow down the number of files shown. This filter string is matched against the filenames as an abbreviation and the files are sorted according to how well they match the given abbreviation. For example in the picture above the filter string is otv and TextMate determines that OakTextView.h is the best match for that (by placing it at the top).
The file I want is OakTextView.mm which ranks as #2. But since I have already corrected it in the past, TextMate has learned that this is the match that should go together with the otv filter string, i.e. it is adaptive and learns from your usage patterns.