Tips and tricks
I was asked on IRC today if TextMate could show the changes from last time the document was saved, and was also informed that smart-typing of quotes conflicts with Pythons triple-quoted strings.
Both things turns out to be surprisingly simple to fix for the user, and since this isn’t the first time I’ve been asked for features where the solution expose TextMate’s ease of customization, I figured it was time to start a Tips and Tricks category on this blog.
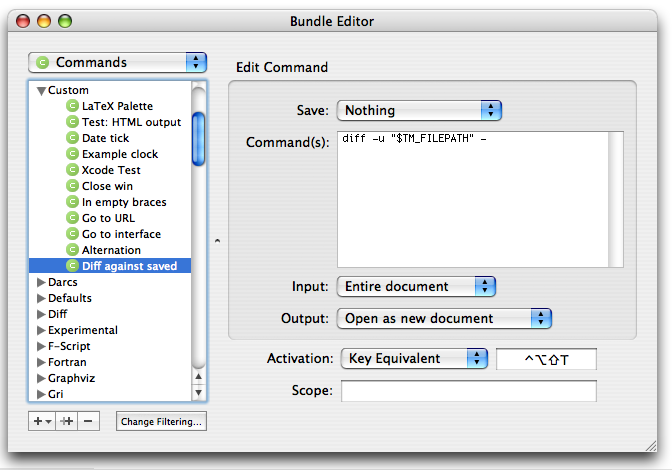
As for showing the differences between the current document and the version on disk: OS X ships with the standard diff command, and TextMate already has syntax highlight for diff files, so what we need is to create a new command that runs diff on the current buffer and the file on disk.
By using - as filename for diff, we instruct it to use the standard input (a unix convention), so the command needs to have standard input set to “Entire document”, output to “Open as new window”, and the actual command should then be: diff -u "$TM_FILEPATH" -. The $TM_FILEPATH is a shell variable containing the full path of current file.
In the GUI this looks like this (click for full size):
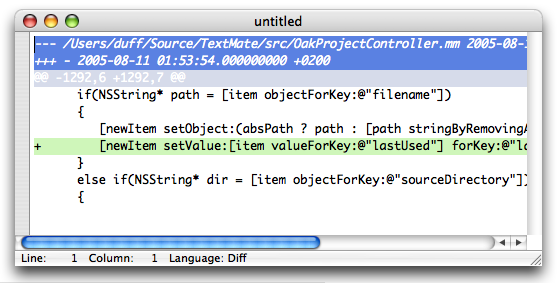
It opens the result from diff in a new window. TextMate will pick up that the result is a diff file and show it like this:
The other problem was the smart-typing. When you type a quote-character, TextMate will auto-insert an extra (closing) quote to the right of the caret (with a few exceptions). If you type a second quote-character, it will overwrite the auto-inserted character (so that when you instinctually e.g. type () you won’t get ())).
In Python there are triple-quoted strings ("""like this""") and while there is a snippet which allows you to type tr followed by tab (to get """|""", | marking the caret) and even press tab again (after typing the string content) to skip the last 3 quotes), many will probably reach for the “ key when they want to start a string.
One can of course disable smart-typing, disable it for Python, or exclude the quote-character from the smart-typing pairs (for Python), but we choose neither.
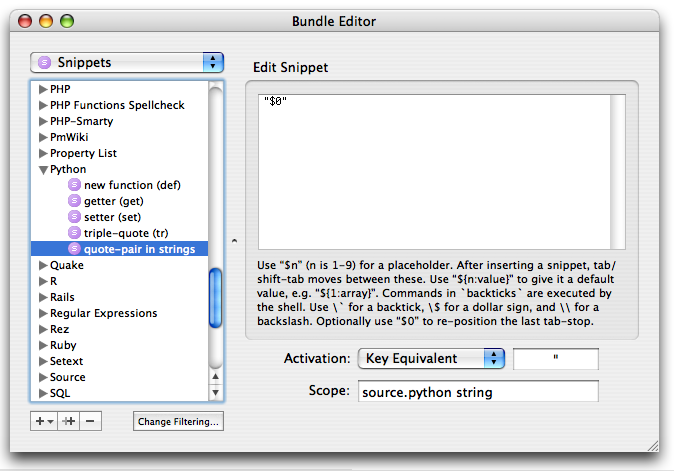
What we really want is to get rid of the overwrite feature of smart-typing, and we can do that by making a snippet which is set to "$0" and have " as key equivalent ($0 is where the caret ends, after inserting the snippet).
But since it’s only inside strings (in Python) that we want to change the behavior of the " key, we set the scope to: source.python string. And it ends up looking like this:
Amazingly simple if you ask me :) We could make it more advanced by letting the Python grammar assign a name to various forms of empty/non-empty double/triple-quoted strings, and overload the meaning of " depending (even more) on context. So if the string was already triple-quoted, it probably should overwrite when at the end of the string (in front of the threee quotes). Generally though, you can use ⌘↩ (command return) to go to the end of the line and insert a newline, so if you have typed this (again, with | marking the caret):
str = """Hello world|"""
Pressing ⌘↩ results in:
str = """Hello world"""
|
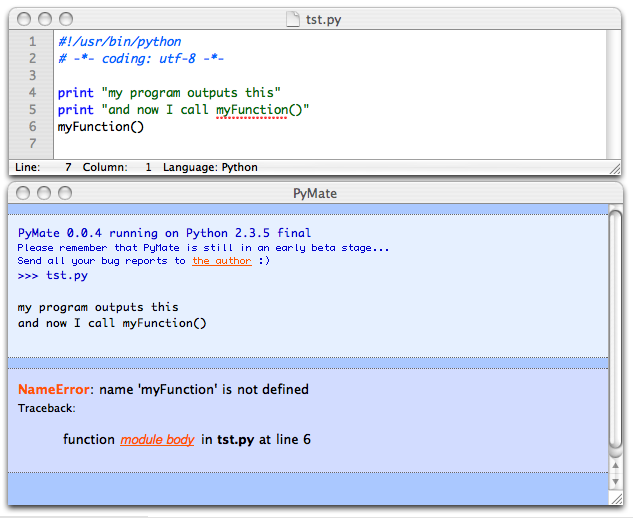
And while on the topic of Python, Domenico Carbotta asked for a running environment for Python which would catch exceptions and show these with links to the source. I pointed him toward how pdflatex and xcodebuild uses the HTML output capability of commands to present a glorified build report with potential errors shown using hyperlinks, and it didn’t take him long to create something even nicer for Python (called PyMate).
It runs your Python script in an environment and catches potential exceptions, showing them nicely with links to the erroneous source and line number, this is how it looks (script in the top window, result in the bottom window):
Brad Miller did a few enhancements (like requesting input) and have added the command to the Python bundle in the bundle repository (it will be included with 1.1b17).
This script has inspired another user to work on something similar for Ruby :)
One last tip, devised while writing this blog-entry: I have a few screen grabs in this post. All of them are scaled down to one third of their original size. Rather than scale them on disk, I put one third of the size in the width/height fields of the <img> tag. This requires that I know the original size, and that I do the math for the 8 values.
To get the original size, I drag the images into TextMate, which triggers the PNG drag command (setup for the text.html scope).
Now to scale the value, what I do is add /3 to the original value, select the expression and press ⌃⇧E, which executes the selection as a Ruby expression (and inserts the result). However, since I do that for all my blog-posts (scale the images down to one third), I have automated this by selecting Start Macro Recording before adding /3, pressing ⌃⇧E, and removing the original value, that way I just need to fire a macro, to scale down the value. As a bonus I’ve made the macro end with a regexp search for (?=\d), which moves the caret in front of the next digit in the buffer, meaning that usually after firing the macro, I’ll be at the next value that needs scaling, and can just fire the macro again.
And just for the records, both ⌘↩ and ⌃⇧E are plain bundle items which you can edit, duplicate or remove (in the Source and Ruby bundle respectively).


